Chapter 2: Tools and Materials
In this chapter I want to focus on the tools that I am using to build this instrument. Whereas a traditional cabinet maker/furniture shop may have a much more expansive set of power and hand tools, guitar building requires a specific number of tools to make the job most efficient.
As a note, you could certainly do this with more or less, but I picked each tool for a specific purpose which I will go into detail on below.


Milling
In building a guitar, I knew I wanted to do it from scratch. That means taking rough sawn kiln dried lumber purchased from a sawyer/lumber dealer and milling it to its final dimensions in my own shop.
The reason for this is two fold: One, rough sawn lumber is substantially cheaper. By buying rough and milling it myself I can save on material cost that I could put towards components down the line. Two, I could control waste. Id be buying just what I need within the rough dimensions that I need and mill it down to the final dimensions.
To do this I am using three tools: A Jointer, planer, and table saw.
JOINTER:
A Jointer is a tool that is used to create a flat face along the length of a board. Along with its fence-and assuming everything is perfectly dialed in- you can create a perfect 90 degree angle. Flat and square angles are extremely important for making solid, stable instruments.
I chose my jointer and planer from a company called CUTECH. They make tools with what are known as helical heads which gives a better cut. The jointer I chose has an 8 inch bed. Its the only company that I have found that makes a tool this size for a home shop. It will allow me to joint much wider boards than a 6 inch jointer, giving me more range in terms of the materials I can work with while still working safely.
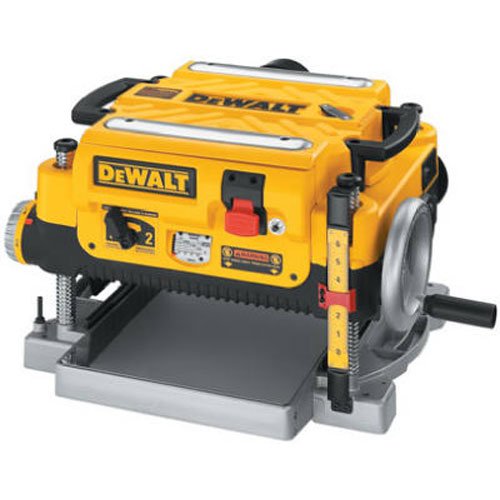
PLANER:
A planer allows you to flatten a board on parallel faces. You run the board through the machine, and the board rides on a flat slab. The cutting head above, references that slab. So if the bottom face is completely flat, the top face will be milled completely flat as well. A planer also allows you to mill a board down to a set thickness. With each turn of the crank, the blades lower and shave a bit more wood off the top.
My planer is the DW735. This machine is a beast for being a bench top model. I picked this for its thickness setting feature. I can set a preset thickness that I want my board to be, and the cutter head will stop dropping once I have hit that preset. This allows me to get precise results without have to constantly measure
TABLE SAW:
A table saw is the central tool of my shop. It allows my to cut would along the grain, across the grain, and cut numerous types of joints. Its also the most dangerous tool (You have a a wheel with up to 80 razor sharp knives spinning towards you at 5000 RPM). With the right respect for the tool, and patience, a table saw will allow you to make some incredible goods from boxes, to cabinets, to all sorts of furniture.
In guitar making I use mine to finish my boards and get straight edges. After running an edge through the jointer, I can run that edge against the fence of my table saw, which is parallel to the blade. The cut will therefore be parallel to the jointed edge.
In combination with the jointer and planer the three allow you to create flat, square lumber.
My table saw is a RIDGID jobsite saw. I picke dthis because of its compact size, its ability to take various blades for different functions, a solid fence, and low cost.
SHAPING
When building guitars the two most used tools are going to be your band saw and router/router table. They allow you to cut out both rough and final versions of your guitar and neck shapes.
BANDSAW
The bandsaw is a great tool because it allows you to cut straight lines and curves. The blade is also stationary and runs along a top and bottom wheel, with the material moving rather than the blade. This makes it a much safer machine to use and with the right speed you can cut very tight curves. I Use my band saw for rough cutting out templates and body shapes, as well as bookmatching tops (More on this in another post).
The bandsaw I use is the RIKON 10-306. It is a 10” bandsaw with a 5 inch resaw capacity. I picked it because I am limited in my shop but needed a reliable bandsaw that would allow me to both cut out shapes and resaw guitar tops. This also fit in my budget and the company is local to Massachusetts.
ROUTER
A router is essentially a motor with a blade attached to the spindle. In guitar making it is used to dial in shapes, cut cavities and recesses and trim up edges. Its one of the most used tools in guitar making.
I have my router under mounted to a table to increase work surface area, visibility and safety.
The router I am using is a HITACHI M12VC. It comes with two bases and allows my to swap between using it in a table when I am trimming up templates and bodies/necks, or put it into a plunge base to drill out cavities.
SANDING
Sanding is pretty straight forward, sanding is designed to remove surface scratches and imperfections and is part of both the shaping and finishing process. For shaping I use a belt and spindle sander with coarse grit sand paper. This allows me to flatten straight edges with the belt, and dial in curves and transitions with the spindles.
For final Sanding I use a random orbital sander, which is a hand sanding tool. I use grits from 80 Grit (Coarse) to 400 Grit (Very fine) for a smooth, flat surface ready to be finished.
Here is my shop in action. While not pretty, it gets the job done. And you dont need a lot to do great work. While a large shop is the goal one day, There’s no reason I cant get the same results in this space.

Tune in for the the next installment where we actually begin the build process and build templates and talk about design.